Showing posts with label wall-hanging. Show all posts

December 22, 2016

Merry Christmas!

Christmas snuck up on me like it does every year. I still managed to make a few quilted things in addition to the usual Christmas baking extravaganza!


I quilted a sweet modern vintage Chevy table runner designed by Cynthia Frenette. It looked super cute hanging from my mantel and is all wrapped up now waiting for its special delivery.


I free-motion quilted a loopy line between wavy double lines. I wanted it to look like cool winter wind. It was a lovely unexpected surprise that it looks like tire tracks in the snow! There are two designs in "Merry and Bright". I choose the table runner. If you would like to make your own, you can find the pattern here.


I've wanted to make a mini muffin tin advent calendar for a few years and finally did it! No more expensive store-bought calendars filled with cheap chocolates for my daughter!


She has really enjoyed it so far and is sad that there are only two days left to open. I had lots of fun scrapbooking the magnetic sheets. I even made a pipe cleaner wreath and a sled out of mini popsicle sticks!


I also made four Log Cabin Kitty potholders. I will share more photos of them in the next post. My Kitty Potholders have received a lot of comments on my facebook page so there will probably be a pattern to come!


A huge thank you to all my fans and followers. Your comments are truly appreciated. They keep me motivated and even give me great new ideas.


It snowed a couple weeks ago and another big dump this week added to it. There was three times as much snow as in the photo! A warm snap and lots of rain in the last two days has melted quite a bit of it but we are expecting more next week. I enjoy snow. It is magical and quiet. That is until it's a slushy muddy slippery mess...


I have been struggling with the squirrels eating all the birds' food. The little rascals chewed through my clothesline to get to the suet cage, and even managed to pry off the binder clips holding it shut before dragging the entire suet away. In honour of these cute rats with fluffy tails I baked gingerbread squirrels so I can bite their heads off!

Wishing you a very MERRY CHRISTMAS & a happy NEW YEAR!


Enjoy your Christmas cookies & quilted crafts :o)

August 2, 2015

Pattern Shop News!

(Please note: If you are subscribed to my blog via email and received this in your inbox today, I apologize... my blog has a mind of its own and is playing tricks!)
- - - - - - - - - - - - - - - - - -

It's Christmas in August! Well, I wish it was.

I would give anything for snow or at least a drop of rain as we are in the midst of a level 4 drought here in the Vancouver area where it usually rains all year long!

The Partridge in a Pear Tree and Winter Wonderland patterns are now available in my SHOP!


Count down the days until Christmas with this cozy Partridge in a Pear Tree wall-hanging. Starting December 14th, take a pear from one of the side border pockets and hang it on the tree each day. On Christmas Day, it’s time to hang up the partridge!


And finally the long-awaited and highly requested Winter Wonderland pattern! Thank you all so much for your patience!


Light a candle in a lovely jar, place it in the centre of your Winter Wonderland candle mat, and enjoy the warmth it brings to your home all winter long. Use your mat as a centrepiece. Two layers of heat repellant batting also makes it perfect spot to rest a hot pot or kettle.


All PatchworkPottery digital pattern booklets include metric conversion chart, stitches & terms section, illustrated step-by-step instructions, and full size templates. These patterns are instant downloads so if you do not receive an e-mail with the link to your pattern immediately, please check your junk mail folder. Please subscribe to my blog via e-mail if you would like to receive shop & pattern updates.


Thank you for all your patience to those of you who have put in requests and have been waiting for patterns. Be assured that I am working on them and I haven't forgotten about you.


Enjoy your afternoon tea & quilted crafts :o)

October 1, 2012

Corner Pocket Tutorial

Using corner pockets is my favourite method of hanging a mini quilt or wall-hanging besides having loops and a rod as part of the finished design. It is super easy, very functional and uses minimal hanging hardware on the wall. It has come to my attention lately that not everyone knows this little hanging trick so today I am happy to share it with all of you.


Materials needed:
fabric scraps
rotary cutter, ruler & mat
iron & ironing board
sewing machine
an unbound mini quilt or wall-hanging
binding
dowel cut to the correct length
push pin or small nails

Step 1: Cut two squares of fabric using your rotary cutter & ruler. I used 3-1/2" squares for this 9 x 12" wall-hanging and would suggest 4" or 5" squares on quilts up to 20" wide. Wider quilts will sag in the centre and need the extra support provided by a good old-fashioned hanging sleeve. Now most tutorials end once the sleeve is sewn on but this tutorial will explain how to actually hang the quilt on the wall.


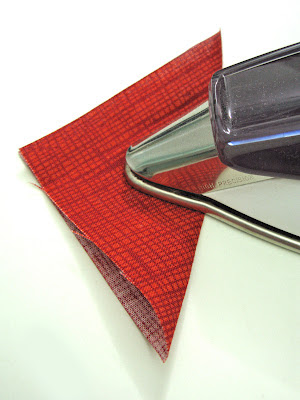
Step 2: Press in half diagonally. It's important to only press and not slide the iron back & forth which will warp your squares because of the bias fold.


Step 3: Topstitch 1/8" from the folded edge. My machine loves to eat pointy bias corners. To prevent mangled points, start sewing on a small scrap that is butted up to the edge of your corner.


Step 4: Sew the pockets to the quilt. Make certain that you are sewing them to the back of the quilt at the top corners. However, if you feel like being more symmetrical you could add them to all four corners. There are others reasons you may want to add pockets to the bottom corners so please keep reading.


Step 5: Bind your quilt either by machine or by hand. I like to use single fold bias binding machine sewn to the front and attached by hand to the back using a blind stitch.


Step 6: Insert your dowel. As you can see here, a pencil was exactly the right size for my quilt but a chopstick or dowel cut to size will work too.


I wanted to incorporate the pockets into the quilt design so I added them to the bottom corners as well! This would also give you the option of hanging the quilt in any orientation. Adding another dowel or heavier rod at the bottom, will help to straighten a warped quilt.


I usually just use a push pin to hang the quilt. If it is larger two push pins or small nails will work well and stop the quilt from being knocked off-kilter. For now I think I will use this little quilt as a mug rug because it looks fabulous with my red mug. Pretty soon I will have a rug for each & every mug I own!


Enjoy your afternoon tea & quilted crafts :o)

September 12, 2012

Pattern Shop News!

'Tis the Season wall-hanging pattern is now in my SHOP. Previously published in Taiwanese craft book Cotton Life no. 4, it is finally available as an individual pattern booklet and even better it is now written in English!


All PatchworkPottery digital pattern booklets include metric conversion chart, stitches & terms section, illustrated step-by-step instructions, and full size templates. 'Tis the Season is a 13 page PDF containing 2 pages that make up the cover, 6 pages of instructions including basic paper-piecing, 4 template pages all reversed for use with fusible web applique and foundation piecing techniques, and 1 page on how to properly print and assemble your very own pattern booklet.


My patterns are instant downloads so if you do not receive an e-mail with the link to your pattern immediately, please check your junk mail folder.


The next patterns I'm working on include Partridge in a Pear Tree, Book Pillow, and Teapot Pillow. I'm also thinking of mixing in some fresh new patterns every now and then so that PatchworkPottery stays interesting.


Which pattern are you waiting for? Would you like to test one of my patterns? Let me know!


Enjoy your afternoon tea & quilted crafts :o)