


Many people have asked me how I make my labels so I have decided to make this little tutorial including pictures and any little tips that I have learned along the way. You will find that making your own labels is quite simple and much cheaper than purchasing custom labels. Pour yourself a cup of tea and enjoy.
Materials needed:
computer, graphics program (I used photoshop) & inkjet printer
regular printer paper
iron-on transfer paper
utility knife, cutting mat & metal ruler
ribbon (I used 1/2 inch natural cotton twill tape)
iron & ironing board
scissors

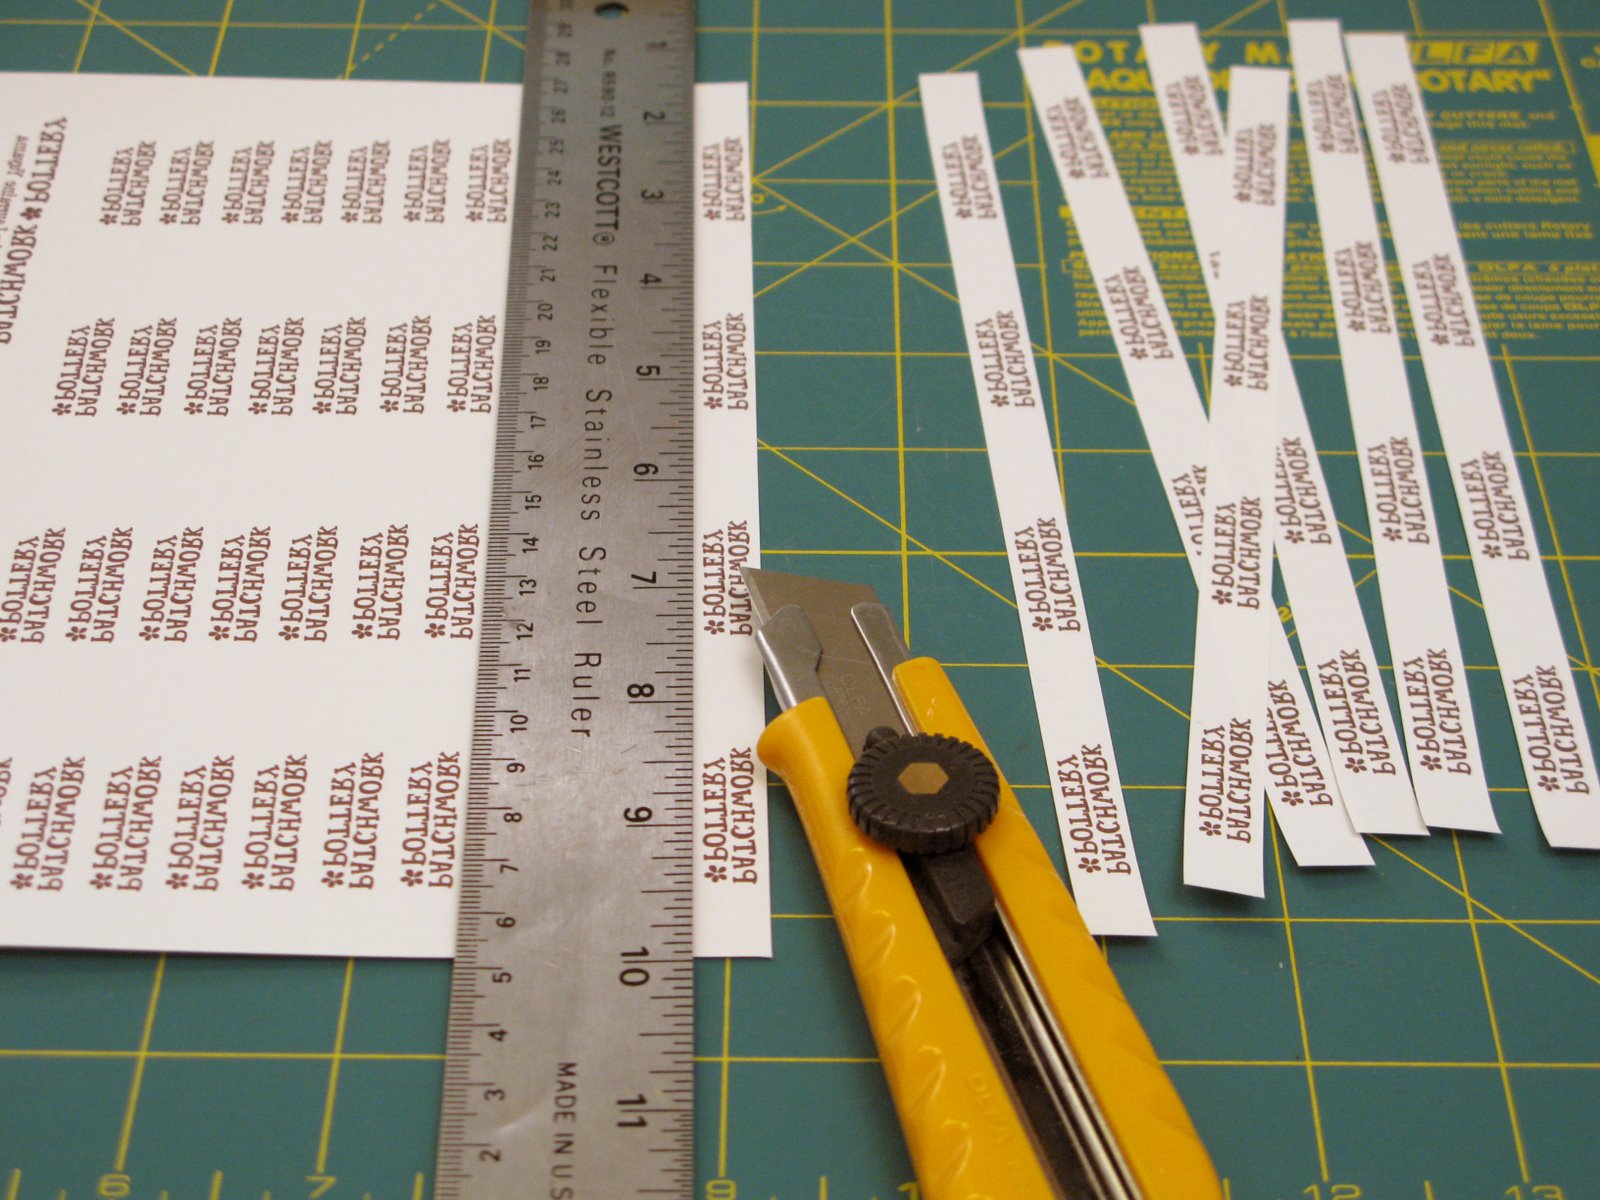
Step 1: Design your image using your program of choice working with a resolution of 300ppi for a clear image. The height of your image should be smaller than the width of your ribbon. Print some out on regular paper, cut them out and see how they fit on your ribbon. Fill up an entire page, repeating images in rows and leaving about an inch between the images in each row. The rows can be fairly close together. *Remember to reverse your image! I can get 96 labels out of one sheet of transfer paper which I think is pretty economical.

Step 2: Print your labels. Follow the transfer paper instructions to set your printer for the right type of paper. Print a test sheet on regular paper first making sure that the image is reversed. Print a sheet of labels on the transfer paper (I have decided to print a few larger labels this time for my bags).

Step 3: Cut out the images preferably into long strips using your utility knife, cutting mat and ruler. Leaving them in strips will save time when ironing and you will be less likely to burn your fingertips. (I know you are not supposed to use utility knives on these mats but it's better than cutting up my new desk!)
Step 4: Iron the transfer onto the ribbon. Lay the ribbon flat. Place a strip printed side down. Press the strip down with the iron. Once it is adhered, slide the iron across several times. *Make sure the iron is not too hot. If your iron is too hot or if you iron it too long, your image will melt! See below.


Step 5: Peel off the backing paper. Wait until the twill tape has cooled before removing the paper. I always leave the previous paper strip on to protect the iron when I am adding a new strip. *The transfer will melt if the iron touches it!


Step 6: Use them! Make a whole roll of labels or cut them as desired. You can turn the ends under and stitch them to your project, or you can fold them in half and sew them into a seam to create a loop tag. Now you are ready to add them to all your wonderful creations!
You could also make laundering instruction labels, and quilt labels using this same method!
- - - - - - - - - - - - - - - - - - - - - - - -
***Additional TIP (added April 28, 2011)***
To remove most of the plastic feel of the transfer paper and to set the image even more, lay baking parchment paper over the transferred image and iron again with a hot iron. It really works!
great tutorial! i might try it out one day! i wonder how it would work for repacing the text with cute little drawings and making cute trim? hmm..boookmarked!
ReplyDeleteI will definately have to try this! Your instructions are great!
ReplyDeleteThanks for the inspiration!
Can you tell me what width twill tape is best and where to source the natural colored tape?
ReplyDeleteIt will be your fault again (last time with the covered buttons), I didnt want to make any labels ...until now. You made it so nice, that I feel I NEED them:-))
ReplyDeleteThanks for the question, Cathi! The tape I use is 1/2 inch wide. I get it from many places including most fabric stores but I find the tape that works best is from Walmart. I have updated my post to include the size. Thanks :o)
ReplyDeleteKriszta, you are too funny!!! You know... those were the only buttons I made. I haven't made any more since! ;o)
ReplyDeleteI made them in the same wya, but I cannot find this kind of tape.
ReplyDeleteHugs,
Veronica
Yay! I've been wanting to do this but didn't know where to start. I was going to carve my own linoleum block and print each one. I must have been crazy. Thanks for leading me down the right path! :D
ReplyDeletethanks Laurraine, I always though what a lovely little labels you have, its great of you to share how you make them!!
ReplyDeleteWhat a great idea! Thanks so much for posting this. :0)
ReplyDeleteI know I will try this for sure.
Thanks for great instructions. I'll made it!!!
ReplyDeleteThank you so much! I love your adorable labels and I have been waiting for this tutorial!
ReplyDeleteThis is soooo great - thanks!
ReplyDeleteThank you so much !!
ReplyDeleteSuch a clever idea. It's perfect for when I make small items as gifts. Thanks for the tutorial!
ReplyDeleteI make my labels the same way using printer fabric sheets, but it never occured to me to transfer the design to twill tape. I like the texture of the tape much better. Thanks for sharing!
ReplyDeleteThis is a GREAT idea!! I absolutely love the way yours turned out! Thanks for posting this!
ReplyDeleteAwesome tutorial! Thank you!
ReplyDeleteCathy :)
That's fantastic - thanks so much! (And where did you find that adorable fabric?!?)
ReplyDeleteGreat tutorial! I really like the look of the twill tape. I'm sure you could use wider twill tape for other applications too.
ReplyDeleteHow does the transfer hold up in the laundry?
ah this is spectacular! ive been meaning to make personalized tags, and this is just the tutorial i needed. many thanks!
ReplyDeleteThank you everyone!
ReplyDeleteStephanie- The fabric is from Japan ;o)
Katie- The transfer paper is used for T-shirts so it holds up very well. I have used my little teacup pouch every day for a year and a half and I can still read the tag though it is a bit worn.
Hi:) Very well written tutorial! I thinki I will be able to do this too:) It seems so much cheaper too.
ReplyDeletethis is sooo smart!
ReplyDeleteThanks so much for sharing this Excellent tutorial!! I was just thinking about ordering custom-design ed labels, but now I know I don't have to! arigatou!
ReplyDeleteYour crafts are fabulous too!
Wow! Thank you for such a wonderful tutorial!
ReplyDeleteWow!!!
ReplyDeleteTanks so much for this!!!!
I just found you blog.. so cute!! What kind of sewing machine do you use if you dont mind me asking.. My husband is getting me one for christmas and i want one sturdy enough to quilt with.
ReplyDeleteAwesome tutorial! Thank you!
ReplyDelete/Cissi, Sweden
cool
ReplyDeleteOh these are great! I did try & make some before, but they didn't quite look right. I shall give them a go again though! Thankyou.
ReplyDeleteThank you so much!!!!!!
ReplyDeleteThanks for sharing! Clever idea =)
ReplyDeleteSuch an elegant solution the the label issue! Thanks so much for the great tutorial.
ReplyDeleteThanks so much for your tutorial, I've been searching everywhere for something like this. I was just wondering if you have to use special ink that won't run when put in the washing machine
ReplyDeleteszuper!!!
ReplyDeletei've made these in the past, even did a tutorial on BurdaStyle but i found the iron on transfer would sometimes peel off the tags and didn't always look so good. Maybe it was the transfer paper i used.
ReplyDeleteYours look great!
wow! thank you so much! i've been thinking about a way to get labels without having to get them custom made and i never ever would have thought to do this. great tutorial!
ReplyDeleteThis is just what I was looking for. Thanks so much for the great tutorial!
ReplyDeleteThanks for sharing this!
ReplyDeleteI tried it with some transfer paper I had and it coated the entire tape in a shiny clear layer, even where there isn't text. Does yours do this? I can't tell in the photo.
What a great tutorial! Thank you so much for the time you took for us!
ReplyDeletehugs ginger
Oh...this is cool. Now I have to look for iron-on transfer paper. Thank you.
ReplyDeleteThank You! This is very cool.
ReplyDeleteThank you very much, just what I needed!
ReplyDeleteThank you for the tutorial
ReplyDeletethanks a lot!
ReplyDeletei love your work and this tutorial is fantastic!
Hi, just found this tutorial and love it. I've been looking for something like this, especially since gift wrapping season is around the corner. Well, I'm off to buy some supplies. Thanks for sharing!!
ReplyDeleteStacy
http://littlebirdiesecrets.blogspot.com
WOW! I am just blown away by all the comments on my tutorial! Thank you to everyone that posted sa link to it on their own blogs :o)
ReplyDeleteSooz- My main machine is an Elna 6005. I bought the used demo a few years back. Recently, I bought a Brother ES2000 from London Drugs for $189 to use as my back up machine and it works great! It has all the stitches I use and it even has a flat worktop attachment (can't think of what it's called right now) and I bought a freehand quilting foot. I have used it and it goes through4 layers of quilting like butter. The buttonholes beat my expensive machine too :o) Hope that helps.
Ly+Alan- No need for any special printer ink :o)
Nikkishell- none of mine have peeled off yet. It took a little trial and error at the beginning to get the iron temperature right. I had trouble with melting and smudging my image. I found if you let the transfer and ribbon cool before peeling it off then the paper would come off smoothly and the transfer would be well-adhered to the tape. Some tape works better than others so ait's always good to try the tape from a few different shops.
Leah- The transfer does feel a bit plastic-y but I find it has a different effect on different fabrics/ribbons. I also found that if I peeled it off while it was still hot it would end up being shiny and if I waited until cool then it would become matte. I think you just have to do some experimenting ;o)
BRAVO et merci pour ce Tutoriel qui va m'être très utile et de plus très facile pour réaliser ces marques personnelles pour les cadeaux à faire....
ReplyDeletevos réalisations sont magnifiques
Thanks for this. Will be giving it a go once I find some transfer paper.
ReplyDeletethank you so much for the tutorial and thanks for the kind words about the watermark. looks like you found my blog before i got to thank you formally. your work is really adorable. i love it!
ReplyDeleteLoVe your blog. Just found it this morning by way of SewManyWays. Awesome tutorial. I'm going to put it in my fav's! In regards to the utility knife. I have an old rotary cutter that I use for paper projects. The blade doesn't have to be as sharp as you need it for fabric, so my old fabric blades get set aside for the "paper" rotary cutter. Works like a charm! ooxx`jodi
ReplyDeleteOH these are awesome! Thanks for the idea!
ReplyDelete-Jen Ditty
Would love to have your link on my site!
www.MomMakes.com
great tutorial!may I ask you one thing?Where i can buy fabrics that you usually use in your project?
ReplyDeletekisses and thanks!
cristina p. italy
Wonderful Tutorial. Love your blog, got you Bookmarked! :)
ReplyDeletesempre più interessante e creativo il tuo blog. ti dedico un post sul mio blog.
ReplyDeleteciao matilda
In English
I find more and more interesting and creative yours blog. I dedicate a post to you on mine blog. hello matilda
Great great great tutorial!! Thank you so much! Such a great idea. Thanks for sharing.
ReplyDeleteThank you so much !! great tutorial!!
ReplyDeleteyour blog is very interesting!!!
kiss..Ilenia (Italy)
Great tutorial! I love the choice of colors, your Blog is beautiful.
ReplyDeleteSerious pretty that you put traductos thus more people of hispanic speech visitarian to you.
Kisses from Chile,
Titi
super Idea!!!
ReplyDeleteThank you very mcu for this tutorial
Great tutorial, I will try! I've just posted a link into my blog! Thank you!
ReplyDeleteJodi: Thank you for the tip on using dull rotary blades & your cutting mat to cut paper! That's great!
ReplyDeleteCristina: I use a lot of Japanese fabrics which I bring back when I visit my In-Laws and also buy from my friend Francy who has two online shop:
http://www.matatabi.etsy.com
http://www.missmatatabi.com
Titi: I did not understand what you meant by "put traductos". Can you please translate this again? Thank you! :o)
This is great! Thanks for sharing!
ReplyDeletethanx, i did something similar in my blog just with an home printer straight on fabric.
ReplyDeletehttp://www.tapuz.co.il/blog/ViewEntry.asp?EntryId=1335360
What a great blog and a fantastic idea, thank
ReplyDeleteThank-you! Thank-you! Thank-you!
ReplyDeleteThis is so much better than what I was doing. I make tag blankets for babies and now one of the "tags" will be a fabric tag :)
I cant wait to make some labels...great tutorial and I love my house tape measure that I bought ages ago. hope you dont mind but I have linked to you from my blog post.
ReplyDeleteIt had never occurred to me to make my own fabric labels, and yet you make it look so simple and achievable ... thank you so much!
ReplyDeleteDawn
Thank you for the turorial.
ReplyDeleteI post a link and a coment in my blog.
I love these labels! I already had some iron-on transfer paper, so I went out and got some twill tape. But now I'm stumped on how to reverse my image. Did you use Word? How did you flip it?
ReplyDeleteI used photoshop and reversed the image. My printer also has a mirror image box that you can check off, maybe yours does as well?
ReplyDeleteyou've solved an enormous problem for me and I can't thank you enough for such a thorough and wonderful tutorial {or annax for pointing me to your blog!}
ReplyDeleteIn the past I had printed on adhesive fabric {which had more of a satiny finish} to put on the back of art quilts and journals:
http://tinyurl.com/3r4efm
However, with some of my more 3D art I really wanted a label I could sew in!
thank you,
Jen
http://www.identityseven.com
Thank you so much for this tutorial! I have everything I need but the twill tape. Off to the fabric store! :)
ReplyDeleteWhat a fantastic tutorial, you are so kind to share it with us, thank you....
ReplyDelete**Alex**
Hi,
ReplyDeleteyour work is wonderful. I really enjoy watching every time you post something.
I have a question though, regarding the labels:
I'm using the exact same technique, but the label comes out glossy and yours isn't. Is it the paper choice?
Thanks
Liliya- Thank you! You could try peeling off the paper when it is hot and see if that gives a matte finish instead. Which brand of paper you are using? Please let me know how it goes!
ReplyDeleteI loved. My name is Patricia Neri and lived in Brazil. I loved your work. Kisses!!!!
ReplyDeleteQuestion about ironing the transfers. My Office Max transfer paper doesn't say how long to iron (but says to follow the specific directions for time, pressure, and temperature listed in some nonexistent place in the instructions). ANYway, can you remember how long you ironed yours for -- and what firm surface you ironed them on?
ReplyDeleteHi Anne: I think you will have to experiment at first. Since I do not have the same paper as you, the time may be different. I ironed mine probably only for about 10 seconds with a hot iron and very firm pressure but always moving the iron back and forth along the ribbon. I hope this helps :o)
ReplyDeleteThanks for posting this tutorial. I've wanted to know how to do this for some time, especially how to use the iron-on transfer. I'll note your tip 'remember to reverse your image' :)
ReplyDeleteYou are so incredibly clever!
ReplyDeleteGénial ton idée ! je vais acheter du papier transfert et m'y coller.... bon week end
ReplyDeleteGreat tutorial! Some advice... MAKE SURE you buy the right kind of transfer paper depending on the type of printer you have. I used ink jet paper in my laser printer and my 'inexpensive' labels have ended up costing me my printer. To top it off, I don't even have iron on labels to show for it...
ReplyDeleteI have used fusible fabric paper and iron on transfer paper ... I prefer the iron on transfer paper ... but I use the one for dark fabrics. No reversing is necessary since you are printing on a white surface. I then create my label and iron directly on my items ... logo and words included. I find this process faster than sewing it in and it shows up great since the label is white. Happy labeling:)
ReplyDeleteTracey
Merci beaucoup pour cette astuce.
ReplyDeleteJe crois bien que le papier transfert peut rendre beaucoup de services.
A bientôt !
Thank you very much for this tip.
I believe that the transfer paper can make a lot of services.
See you soon!
I'm in the market for labels and this is a fabulous way to create your own! Thanks for sharing. I'll definitely be trying this in the coming weeks.
ReplyDeleteHave been shopping for labels recently. This is a great idea! Thanks so much for sharing. Will be giving this a try very soon.
ReplyDeleteIf we use a cream color twill tape ( like the one you used), will the transfer paper leave a white background? We just want our brown lettering logo on the tape without any background color. Is this possible? It looks like you were able to do it.
ReplyDeleteyou've got too many comments , I don't think you 'll read my one but just because you deserve it : Your blog is very sweet !
ReplyDeletethank you.
Hello! your tutorial enchants to me, I have been excited and I did this morning. It lacks only me to transfer them to the cotton tape. Thank you very much to teach this magnificent idea to us. Greetings from Chile. Veronica
ReplyDeleteHi Laurraine: First of all, sorry as I forgot to thank you for the tutorial. I see that you noticed my post with a link at my blog and Flickr page! We have to try another transfer paper. The one we choose is not the best option. Well, thanks again for your nice ideas!
ReplyDeleteEste tutorial es genial, muchas gracias por compartirlo. Yo he disfrutado mucho haciendo mis etiquetas.
ReplyDeleteMe encantan sus labores, son preciosas.
Thank you so much for this tutorial! I have been putting off ordering labels but need something to put in my bags! This was the PERFECT way for me to get started. I've linked to your tutorial with a picture on my blog. http://zhoukdesign.com/wordpress
ReplyDeleteThank you for this tutorial, it's brilliant! I have posted about it on my blog at http://jennyforeman.wordpress.com/ and I have tried to do a trackback but I'm not sure if it's worked as nothing seems to show up here, I'm very new to blogging :s Just thought I would let you know that I had linked :)
ReplyDeleteThanks for sharing this great method of making fabric labels. I'd put off ordering some, because I really like to just make every part of my creations myself, and now I can, which is awesome!
ReplyDeleteGreat tutorial! I was just asking about this on Etsy when I did a Google search and found you. I posted this link in the Etsy thread, Tweeted you, and made a post about you with this link over at my blog. Thanks!
ReplyDeleteThis is fantastic! And look at your cute Ikea jar, too!
ReplyDeleteHoly smokes, this is awesome! Bookmarking!
ReplyDeleteI AM VERY INTERESTED IN LEARNING THE TO DO LABELS OF DIFFERENT KINDS Holy smokes, this is awesome! Bookmarking!
ReplyDeleteOh, these are wonderful. I just spent 6 dollars on 8 labels and they're not even with my real name. Hard to find 'Patrice' anywhere. Thanks so much for this great tutorial!! :0)~
ReplyDeleteWhat a great idea !!!
ReplyDeleteThank's for this tutorial !
Do you know that, in France, several blogs has talked about it ?
Awesome tutorial. Amazing what can be done with trasfer paper. I do have one question. How in the world do you reverse the image?
ReplyDeleteLee, You should be able to flip the image in whatever program you used. If you can not, perhaps your printer has a box to tick that says mirror image...mine does :o) Hope that helps.
ReplyDeleteThank you & Good Luck, Laurraine
Thanks This is a great money saving idea!!
ReplyDeleteThis seems to be a good way to create custom clothing labels at home.
ReplyDeleteYou make it look so simple, I am going to give it a try soon!
I found your tutorial several months ago and bought all the supplies right away, but didn't actually make the labels until tonight. It worked like a charm and I absolutely adore my new labels. Thank you so much for sharing your methods!
ReplyDeleteWhat a great tutorial - I started this project tonight and already LOVE how it makes my creations look so much more finished and professional!
ReplyDeleteThank you for sharing!
Thanks alot for sharing this great tutorial. I certainly will try this one and you give very Clear tute..:D
ReplyDeletePhi, it's really cool!! Way to go, girlfriend.
ReplyDeleteThis is awesome. I'd been considering for the longest time about getting some custom labels made for my stuff but you're right-they can get pricey and they're not always so finessed to one's own individual taste. I had considered the transfer paper already but your suggestion about the ribbon is so much more efficient than what I had in mind, which was just some old fabric.
ReplyDeleteI already did it with the help of a friend. It looks great! We used it for naming all the school clothes of our children ...
ReplyDeleteThanks for this great tutorial ...
Hello, I would know how I can invert the imagine...please aswer soon ...thank you...!!!!
ReplyDeleteHi there, How do they hold up in the wash? Thanks!
ReplyDeleteResponse to: Anonymous said...
ReplyDeleteHello, I would know how I can invert the imagine...please aswer soon ...thank you...!!!!
On my Lexmark printer, under its print properties, I am able to select the "mirror" as the layout so that it will invert print. Hope this helps!
Yes, selecting mirror image on your printer will invert the image :o) Good Luck with your labels!
ReplyDeleteThis works absolutely GREAT! Thanks for posting this tutorial :-) SO inexpensive compared to ordering them!
ReplyDeleteThese are an awesome idea. Just one question, though. Will the print wash off please?
ReplyDeleteRegards
Christine
Hi Christine,
ReplyDeleteThe transfers are made for t-shirts so they will not wash off but will eventually fade a little from repetitive washing.
Waooo, excellent Tutorial. Thanks You.
ReplyDeletecan i use freezer paper instead of iron on transfer paper?
ReplyDeleteNo, sorry you can not. Transfer paper and freezer paper are totally different :o)
ReplyDeleteV E R Y C O O L ! ! !
ReplyDeleteTHANK YOU!!! I've been trying to figure out how to make labels for the crafts that I make. For those that want to know how to do it in word. Click on the Art icon, pick the word design you want, you can fix it to how you want it. Get it how big or small and font you want. Than click on the draw button and click on rotate and flip. Click on fick horizontal. Now you just have to position where you want it and so forth. But waalaa how to reverse your text in word.
ReplyDeleteThank you again for showing how to make our own labels. Found I love the satin look instead of the glossy.
Thank you very much for your fabric labels tuto !!! I hope you don't mind I have put your URL on my website ...!
ReplyDeleteVéro http://petitesbobines.canalblog.com/
Hi,
ReplyDeleteI just wanna say it's really nice of you to share! I love reading your entries! Have also decided to get your books! Keep creating and best of luck!
Amanda
Awesome, thank you. I have been looking at purchasing labels from a designer which is not cheap. With trying to start up my own shop this is just perfect and will save a little green$$$$. Going to try printing labels tomorrow. Once again thank you .
ReplyDeleteWonderful tutorial, I am very grateful for the information. Thanks so much.
ReplyDeleteI wish I had found this tutorial before, I just got my labels are I am not very happy with them, so i will try this next time, I already do this with the brand/care label I don't get how I didn't think of this as well!!
ReplyDeletemany thanks
Marga
Thank-you so very much for this amazing tutorial! I just ordered some bulk twill tape online, and am looking at getting the transfer paper now... can't wait to make my labels!
ReplyDeleteChristine
Thanks for this step by step tutorial, with your help I just made some pretty labels for my girl's clothes, she is starting daycare next week and everything has to be label. People kept telling me to use a market, but I was like mmmmmm market on my pretty angel's beautiful clothes?, and then someone told me about transfer paper, much better idea, needs work but it is worth the extra effort.
ReplyDeleteThank you very much for this tip.
ReplyDeleteHugs
Belle Gangstøe
Thanx for this tutorial! Love this idea!!!!
ReplyDeleteThank you for the great idea and welcome to www.edzia-goodzies.blogspot.com
ReplyDeleteThank you Lauraine...for this tutorial...I made label for myself
ReplyDeleteand blogged about it...thank you so much
I have been searching for a way to make these. Thank you. I found the transfer paper and am ready to go, but cannot find the cotton twill tape. I've been to every sewing supply store in my area...only wide cotton twill tape.
ReplyDeleteCan you refer me to an online supplier, or I'd be willing to pay you to send me some???? I know a lot to ask from a stranger. But I'm out of ideas.
Thank you very much! I am knitting a lot of stuffs for Xmas.. my friends will be surprised by my personalised labels!! ;o)
ReplyDeleteBye for now..
Renata
Hi there,
ReplyDeleteThis has been a popular subject, huh?
Thank you for sharing. I have done these labels, and they came out great! They did have a plastic appearance, but from other comments I guess is the type of paper? Still pretty cool...
I have posted about it on my blog with a link to your tutorial!
Here it is: http://birdcrafts.blogspot.com/
Hope this is ok with you?
Thanks gain
This is the most understandable and easy tutorial of making your own labels! Thanks a million now I will look for those transfer sheets. Happy crafting and thanks again.
ReplyDeleteHello great tutorial!! thanks for sharing, I love your blog and stuff.
ReplyDeletethanks and have very nice holidays..
Oli
Wow! This is a great post. I like how precise and brief your instructions are and it made it a lot easier to understand because of the pictures. Well done!!
ReplyDeleteThank you so much! I wanted to make a quilt label and this is exactly what I was looking for! Now I want to make my friends some personalized gift ribbons for their holiday packages. Fun!
ReplyDeleteI tried your tutorial as they look so great. However the backing stayed on the twill tape and was shiny then lifted up on the edges and came right off, design and all .. used an entire yard of twill tape and not one label .. I must be doing something wrong. I'm assuming just the wording is to stay on the tape ..
ReplyDeleteHi Toby,
ReplyDeleteDon't give up hope!
Sounds like maybe the iron was not hot enough or you didn't leave the iron on long enough? The entire clear plastic will transfer to the ribbon... not just the words but it should end up looking matte not shiny and blend right into the ribbon. I get better results if I wait for the ribbon to cool entirely before removing the paper backing.
Different transfer papers will give different results and so will twill tape from different places. I used to get mine from Walmart at Lougheed but they have cut back on their sewing supplies. Dressew downtown is another good place to get twill tape.
Next time try a couple at a time just to make sure everything is working. You could also stop by for tea and a quick demo if you like as I saw that you also live in Vancouver :o)
Laurraine
Hi Laurraine ... I sent off an email before I checked your site LOL .. blame it on the season and od'ing on fabric .. I got my twill tape at Fabricland .. I got some that was a polyester and some that is cotton, neither one was better than the other .. I did get some light brown and found it doesn't work on that color ..
ReplyDeleteIt left more a shiny finish than matte and I know it will eventually peel off or bubble .. I got the Avery T Shirt Transfer paper at Wal Mart (ours is getting out of sewing stuff too) .. maybe another brand would work better, or perhaps another store for the twill tape .. the twill tape I got is ecru, maybe I should have gotten white??? a demo would be right up my alley .. tea is a definite reason for meeting :)
Toby
Great tut, thanks a mil for sharing!
ReplyDeleteThanks a lot! I'm going to get iron transfer paper and make my own labels right now.
ReplyDeleteLove your blog!
Hi There sweetie
ReplyDeleteI Just bought Your book here in Denmark and found your very good idea here and Im going to use it right away, Thanx for some fine Patchwork thing - That I can make my self just by looking at your pictures,.... Love your TheCup bag....
Love from Denmark
And Lone
Nice job--I'm looking forward to trying this.
ReplyDeleteOne suggestion: Use the back of your mat when cutting with the utility knife. No grid but less damage. OR save an old blade/handle and use it for paper only. Thanks again!
Thank you very much for the tutorial, I placed a link on my blog, I stayed with some labels and some do not shine, I think we should wait for this cold to remove the paper, so the next time will be perfect. Thank you very much.
ReplyDeleteThank you Nick! I think I mentioned in Step 5 to wait until it has cooled before removing the paper. I am happy it worked out for you :o)
ReplyDeleteHi! Does anyone know how to tile the labels in photoshop? I've created my label but I need further instructions on how to duplicate it 96x! I'm at a loss...
ReplyDeleteHey this is really great! With the transfer idea, you can do much more than labeling. I'm definitely going to use your great idea for my scrapbooking. thanks!
ReplyDeleteHi! This is a great tutorial. I've linked it to my blog for Daily DIYs for my blog readers. Hope you don't mind but in a way you'll get lots of traffic to yr blog,right? Thanks :D
ReplyDeletehttp://mytinkerspace.blogspot.com/
great tutorial, love your blog!
ReplyDeleteterima kasih.
I'm so happy with the tutorial. I've linked it into my blog too... Thank you very much!
ReplyDeleteThank you for posting this fantastic idea. I was surfing for economical custom iron-on cloth labels for my hand painted banners (www.glorybebanners.com) and came upon this website. And, as luck would have it, I have a packet of transfer sheets on my shelf just waiting to be made into lables. This has saved me so much money. Thanks!
ReplyDeleteCarol
Glory Be! Inspirational Banners
Wow...very nice. Can you do high resolution, like with a photograph?
ReplyDeleteOn the instruction sheet that came with the transfer paper it says to wash and dry the item after you iron on the design to avoid smears or bleeding. Do you ever wash your twill tape when you are done making them? Thanks!
ReplyDeleteHi Purse Maker, I have never pre-washed my tape. I have however washed my items when needed and therefore the label gets washed and seems fine. Hope that answers your question. Hugs, L
ReplyDeleteThis was a great tutorial! I just used it to create a ribbon to use for my business. I still want to try the twill for fabric labels as well! thanks for the inspiration! http://imtopsyturvy.blogspot.com/2010/04/make-your-own-personalized-ribbon.html
ReplyDeleteok I've been wanting to know how to make labels forever! Thank you! I discovered your blog through SAVING WITH SHELLIE.com Thank you!!
ReplyDeleteThanks for such great tips! And how convienient that I just found this through twitter as I was just saying last night that I need new labels:)
ReplyDeleteI think I will be going to get some transfer paper today!
I have not read through all of the comments, but another fun thing to do for those that you want tagless are to just iron the labels onto your project. Which is what I have been doing.
ReplyDeleteI will definately be buying some twill tape though for other projects!
Since I have all of these things in the house I will be trying this soon. Twill tape was on sale at Hancock so I got two rolls!! Yipee. Thanks for the great tutorial. Wonderful Idea.
ReplyDeleteThis is a great tutorial; Thank you for sharing.
ReplyDeleteThanks a lot for sharing this tutorial!!I've followed and here I am making my own labels!!!
ReplyDeleteThis comment has been removed by the author.
ReplyDeleteThanks for sharing. Ive just been and bought my transfer paper and twill tape on eBay and will be using your coffee staining method for transforming mentioned white twill tape!
ReplyDeleteThanks again
Georgie :)
What a great idea! I've been looking for labels for a little while now and this DIY method is so great! I posted it on my blog, facebook, and myspace. It's TOO good not to share. I am currently waiting for my twill tape to arrive. Super excited! Thank you for sharing!
ReplyDelete-Lauren (Get Thready)
Thanks for this wonderful tutorial, I've been looking for something like this. Could I ask you where you get the twill tape? It's not easy to find. Thanks a bunch.
ReplyDeleteOI taste very of its products, would like to acquire pdf of TeaCup pouches and 3D Quilted Teapots & Teacups is possible to buy in etsy, already I bought a pdf and I wait the archive One I hug Eliane
ReplyDeleteeliane2m@terra.com.br
Sooooo excited! Can't wait to try this idea! LOVE your labels, thank you!!❤
ReplyDeleteHello, girl where do you get so much creativity and good taste ... yes you have fairy hands (laughs).
ReplyDeleteMust learn to do these things.
I'm from Brazil and was wondering if you can send me some things ...?
Here you do not have these beautiful things, such as cloth, ribbons and etc ...
or, pass me a website that can buy.
Excuse the bad English, but in truth I can not speak nothing, I researched a translator to help me.
I sent an email okay?
anxiously await your response.
Kisses
and great week.
Danielle Jungers
Obrigada amiga por compartilhar seu tutorial!
ReplyDeleteFoi de extrema generosidade!
Muito bem explicado!
Que o teu final de semana seja ainda mais Abençoado!
1000 beijos!
: )
Lu
This tutorial is the best! I've blogged and linked to help share your craft-i-ness.
ReplyDeleteThat`s what I was looking for, thank you, thank you, thank you!!!
ReplyDeleteThank you for sharing!!! I have been looking to make labels for a while now :)
ReplyDeleteIt's a wonderful idea and your blog is beautiful.
ReplyDeleteCongrats from Spain!!!
Great tutorial! Thank you for the information. I could have never thought of this idea myself. This is the best.
ReplyDeleteTerrific tutorial. Have you ever used satin or any other kind of ribbon instead of the twill?
ReplyDeleteThis is one tutorial I MUST do immediately. Thank you for sharing.
ReplyDeleteWONDERFULL blog, thank you !
ReplyDeleteI'm seriously in love with this tutorial. Thank you very much.. will try it.. =)
ReplyDeleteThis mini tutorial is so amazing. I think in all post in making labels that I read, this one is the easiest to follow. Now I know how to make very cute labels.
ReplyDeleteWow! What an awesome tutorial. I've definitely been making my labels the hard way. Can't wait to try this out~
ReplyDeleteWhat a lovely-cute creation. I was so pleased to visit your blog and learned something that is very much useful. I really love your work. thanks for this great tutorial that really did inspired me.
ReplyDeleteGreat job! I needed labels and did not have the $400 they would cost. I got 96 for the $2 cost of 4 yds of twill and iron on transfer that I had hanging around for 5 years!
ReplyDeleteFantastic! Thank you so much for sharing!
ReplyDeleteGreat tutorial! I made a page full with different fonts and clip art in Word. I made a few on the twill tape and ironed a couple right into a couple garments that I had already made for my kids. I hope that they can now tell the front from the back and won't complain about itchy tags! :
ReplyDeleteThe prefect solution to my dilemma. Thanks
ReplyDeleteThank you so much!!
ReplyDeleteIt's a great idea and really looks good!
ReplyDeleteI'm trying to do it but... sorry.. can you give some suggestion on what program to use and how to reverse the image?
thank you
I was just looking for labels to order (none of which I liked) when I stumbled on your fabulous post. What a great idea! I've got everything except the ribbon (I ironed on my kid's name on the inside of her school uniform/sweaters).
ReplyDeleteTo Anonymous who asked how to print in reverse: You can usually find this potion in your print dialog box/print settings. At least you can on a PC. I've not tried to find it on my Mac yet. (Once I went Mac, I've not been back! HA!)
Cheers! And thanks again!
Thank you so much for the really helpful instructions!I am also about to make my own labels and that was exactly what i needed! :-)
ReplyDeleteawesome!!really impressed and thank you. i really want to have mine and here you showed me the way.
ReplyDeleteGreat idea. Your blog is my inspiration! I was thinking a long time how to do my own labels. So here I got the answer. THANK U very much! :)
ReplyDeleteLove your blog, hope you don't mind but I've added you to my list of inspiring blogs
ReplyDeleteI realise that I am not the only one that has found your tutorial beyond useful. Thanks for the advice. I now have 8 fab labels.
ReplyDeleteHey, thanks for the lovely tut!
ReplyDeleteI have a question: does the transfer paper thing works really good with a dark fabric too (in this case, the printed color would be white or beige)? Did you already try it?
thanks again!
For light font on dark background I would buy the t-shirt transfer paper made especially for black t-shirts. Let me know how it works :o)
ReplyDelete