


Using corner pockets is my favourite method of hanging a mini quilt or wall-hanging besides having loops and a rod as part of the finished design. It is super easy, very functional and uses minimal hanging hardware on the wall. It has come to my attention lately that not everyone knows this little hanging trick so today I am happy to share it with all of you.

Materials needed:
fabric scraps
rotary cutter, ruler & mat
iron & ironing board
sewing machine
an unbound mini quilt or wall-hanging
binding
dowel cut to the correct length
push pin or small nails
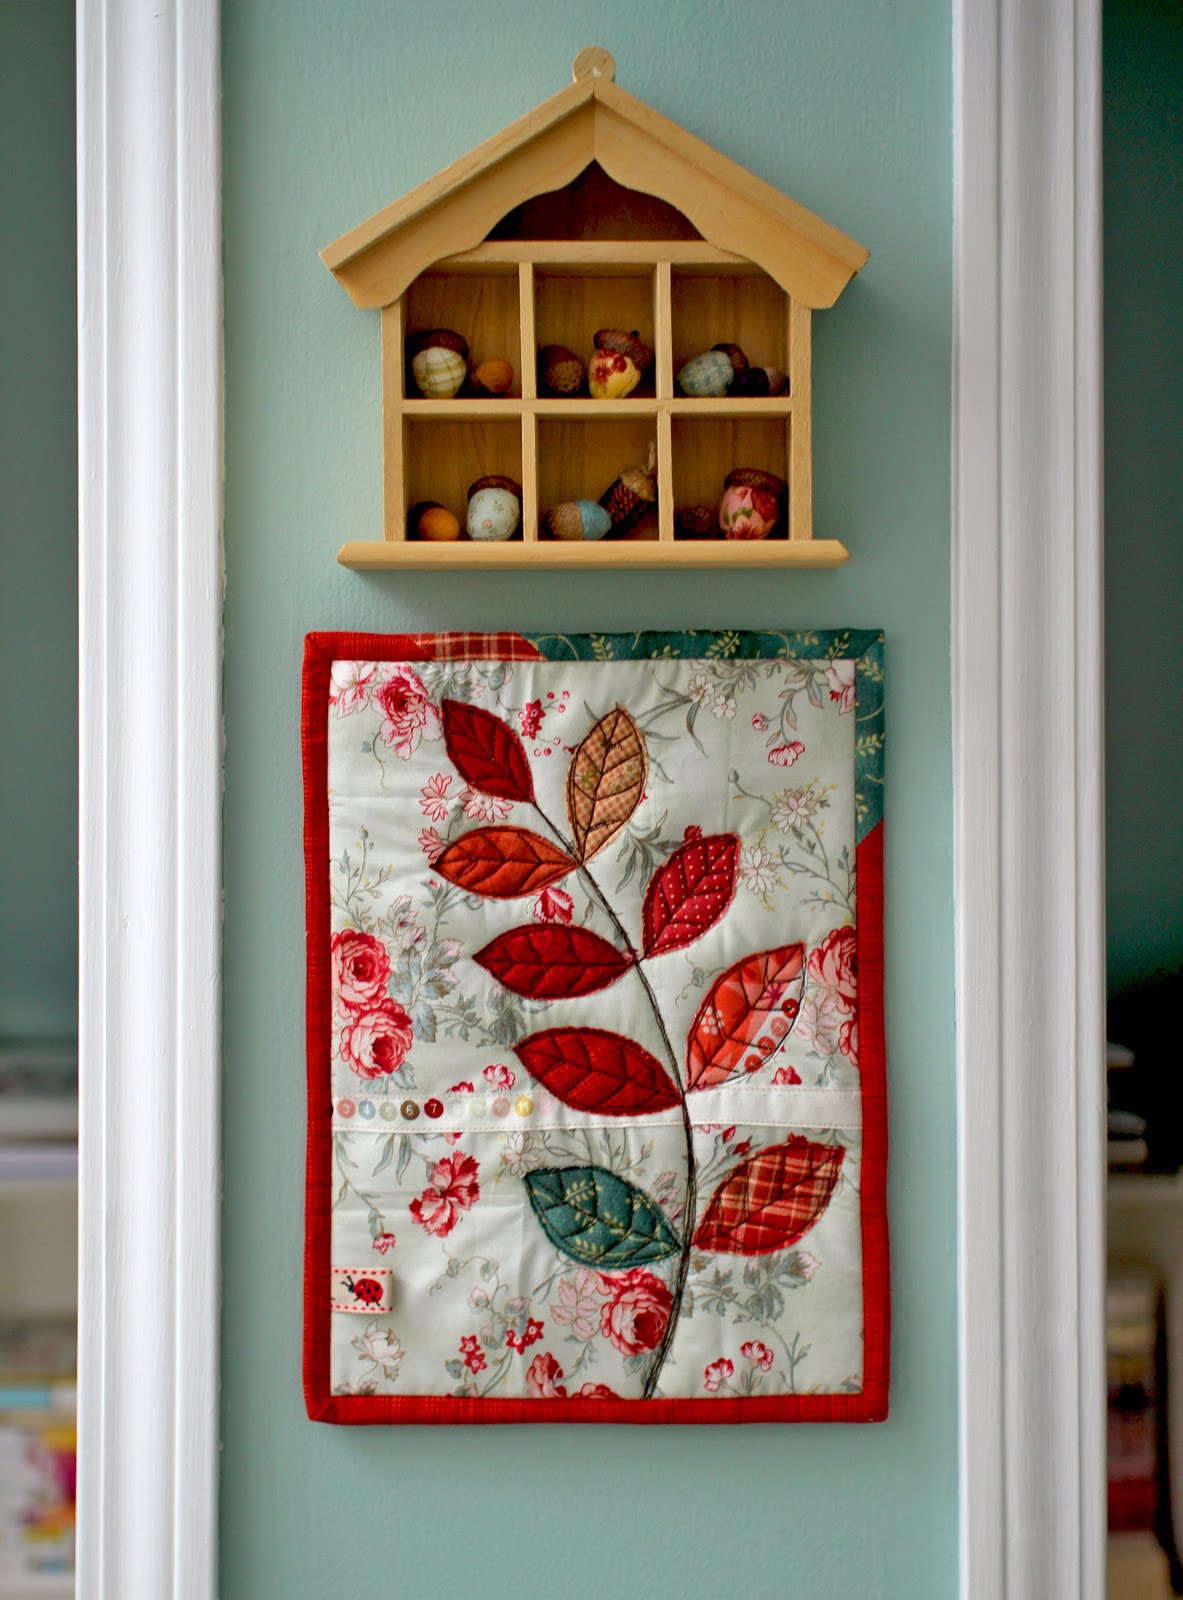
Step 1: Cut two squares of fabric using your rotary cutter & ruler. I used 3-1/2" squares for this 9 x 12" wall-hanging and would suggest 4" or 5" squares on quilts up to 20" wide. Wider quilts will sag in the centre and need the extra support provided by a good old-fashioned hanging sleeve. Now most tutorials end once the sleeve is sewn on but this tutorial will explain how to actually hang the quilt on the wall.

Step 2: Press in half diagonally. It's important to only press and not slide the iron back & forth which will warp your squares because of the bias fold.

Step 3: Topstitch 1/8" from the folded edge. My machine loves to eat pointy bias corners. To prevent mangled points, start sewing on a small scrap that is butted up to the edge of your corner.

Step 4: Sew the pockets to the quilt. Make certain that you are sewing them to the back of the quilt at the top corners. However, if you feel like being more symmetrical you could add them to all four corners. There are others reasons you may want to add pockets to the bottom corners so please keep reading.

Step 5: Bind your quilt either by machine or by hand. I like to use single fold bias binding machine sewn to the front and attached by hand to the back using a blind stitch.


Step 6: Insert your dowel. As you can see here, a pencil was exactly the right size for my quilt but a chopstick or dowel cut to size will work too.

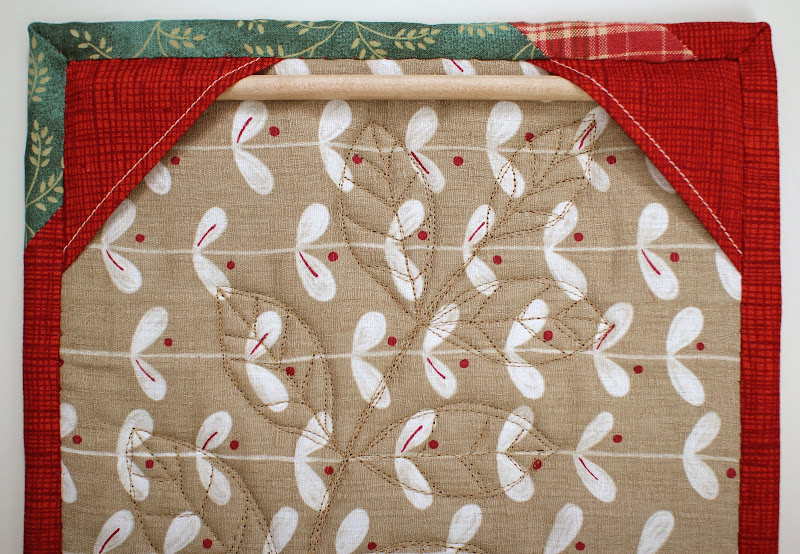
I wanted to incorporate the pockets into the quilt design so I added them to the bottom corners as well! This would also give you the option of hanging the quilt in any orientation. Adding another dowel or heavier rod at the bottom, will help to straighten a warped quilt.

I usually just use a push pin to hang the quilt. If it is larger two push pins or small nails will work well and stop the quilt from being knocked off-kilter. For now I think I will use this little quilt as a mug rug because it looks fabulous with my red mug. Pretty soon I will have a rug for each & every mug I own!


Muy buena idea. Gracias.
ReplyDeleteThanks for the tutorial. This is a great idea for small quilts.
ReplyDeleteAnd I really love your mugrug. Beautiful.
What a great idea!!! Thank you very much for the tutorial and for the photos!!!
ReplyDeleteGreat tutorial!!! Thank You for sharing:)
ReplyDeleteI love this! Thanks for the tutorial, I've been hoping for one. How cute that you can hang a mug rug? I would NEVER have thought of that!!
ReplyDeleteBeautiful, love the autumnal feel to this
ReplyDeleteThanks for the tutorial. This is much easier than a sleeve for small quilts. Your mug rug is very cute!
ReplyDeleteque bien luce, se ve muy guapo!!!!!!
ReplyDeletesaludos
This is such a neat idea. I might try it with a tapestry I've been trying to figure out how to hang.
ReplyDeletethank you so much!!!!
ReplyDeleteStella
Thank you for the detailed tutorial! I'm new to quilting and would like to start making some mini quilts - this is perfect!
ReplyDeleteI have bookmarked your post for later reference :)
That is one purty little quilt laurraine. I liked the tute too!
ReplyDeleteThanhs for this good idea .
ReplyDeleteThanks for this "astuce" (i'm french) et for your blog which is a real pleasure to read regularly... All is beautiful on it.
ReplyDeleteThank you Laurraine for this tutorial! Another great idea!
ReplyDeleteHey!!! That's a nifty idea. Thanks for the tip.
ReplyDeleteCheers, Anita.
I love your new mug rug! It looks fantastic! Is that selvedge in the middle? I love it!
ReplyDeleteA lovely idea, beautifully explained. Thank you x
ReplyDeleteTe ha quedado precioso. Un beso
ReplyDeleteRosa Ana
I love it!!!
ReplyDeleteOlá, Laurraine!
ReplyDeleteObrigada por este tutorial. Eu achei muito prático este método, além de ficar com um ótimo acabamento. Seus quilts são maravilhosos!
Um abraço
Iva (São Paulo- Brasil)
Great idea, thank you!
ReplyDeleteA lovely small quilt...and a smart way to hang a quilt.
ReplyDeleteI like your work a lot, you have an amazing talent :) Greetings from Poland!
ReplyDeletelovely.. love your idea
ReplyDeleteLove reading your blog, just wish you posted more often.
ReplyDeleteVery sweet!! Perfect idea for a gift! Thanks for the tutorial!!
ReplyDeleteThank you for the tutorial. This is a little work of art!! kiss from Italy
ReplyDeleteThank you soo much for the tute. I loved looking at you site. Such beautiful work. Thank you.
ReplyDeleteHermoso tu trabajo. Muy alegre y original.Voy a tratar de hacer estos hermosos posa tazas.
ReplyDeleteBesos y gracias por la explicación
Susana
it's so wonderful!
ReplyDeletei like your work, that's really beautiful!
Patchwork kraliçesi, mutlu yıllar.
ReplyDeleteGreat idea. Thank you for the tutorial...:-)
ReplyDeleteLove the graphic selvage across the background!
ReplyDeleteThank you for this great tutorial! I had always wondered how best to display a wall quilt! I linked this within today's blog post! http://lanettascreations.blogspot.com/2013/04/sudoku-mini-quilt-wall-hanging.html#.UWQ96ZOshac
ReplyDeleteI found your blog through pinterest- WOW! I LOVE most everything I see!
ReplyDeleteSeus trabalhos são divinos!! Estou amando cada postagem.
ReplyDeletebjs
Eine Klasse Idee.Und es kostet nicht viel.
ReplyDeleteVielen Dank Christa
Merci beaucoup pour ce super tuto, doux dimanche et bonne semaine. Francoise76
ReplyDeleteMerci pour ce tuto très bien expliqué.
ReplyDeleteOne of my quilting customers used these on a wall hanging but I didn't undrestand how to make them. Great tutorial! I will be using it for wall hangings and minis. Thanks! Merci! Gracias!
ReplyDelete